Sunday, 11 October 2015

Vintage Lace Doily Dream Catcher DIY

I'm all swept up at the moment in a house move that has come to a stand still, however, that can't stop me from planning for the new look of the new house. 

Dream catchers seem to be a big thing at the moment and I've been dying to make one for little Elsie's room, so here is my version in a nice DIY blog... Although, I'm so pleased with the results I may just have to keep this for myself! 

I think this would make a fabulous gift, a lovely Christmas decoration, or be perfect for a wedding... The possibilities are endless. 


So here's what you'll need. 
(I picked my doily up from a vintage fair a while back, and the rest of my
 supplies came from Hobbycraft)


The first step is super easy, but takes some waiting for the glue to dry, 
simply paint the mod podge onto one side of the doily. 
Once dry, repeat on the other side.
After each coat ensure the doily is sat 
in the shape you want it to be at the end as this will fix the shape.


(you could dip the doily into mod podge to speed up the process, however I was wary that this may lead to the it pooling between the doily holes which I wanted to avoid.) 

On the second coat, I also took the opportunity to 'glitter dip' the feathers. 
Simply paint your feathers with mod podge and dip them into the pot of glitter. 
You may wish to try filling a dish with glitter and lying the feathers flat into this if you don't want the feathers to split. 


Once everything is dry you are now ready to assemble. 
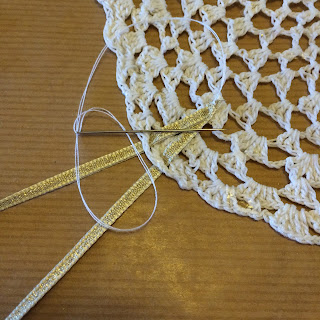
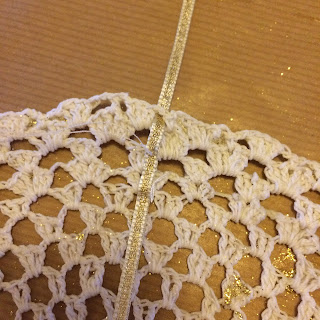
Find the centre point at the top of the doily and feed your ribbon through to the back, then secure it using a needle and thread. 
You could tie a knot here, but I do like that the stitch keeps the ribbon flat and more control over the way the ribbon hangs. 


At this point I decide that the doily might need sprucing up a bit, I did consider adding beads, but I had the glitter and the mod lodge out so thought I may as well make the most of the mess! I just pasted the edges, before carefully sprinkling glitter over the top. 


Now cut your ribbons to the size you want. Remember, you can always shorten if needed later, but you can make them longer, so if you're not sure, go a little longer, then take away. 

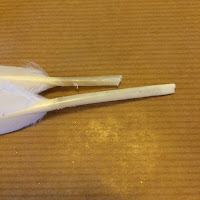
I then trimmed all my feather 'stems' to an even size and filled them with mod podge before inserting the ribbon side the stem. Again, I was trying to avoid knots here. 
I decided to add beads to the top of the feathers for a nicer finish.


I then tied a knot at the same point of each of the feather ribbons and added another gold bead for extra detail. 


The other ribbons were super easy, I just tied a knot in the end and threaded beads on. 


You should now have all these parts ready to assemble...


Using the same method as for the ribbon loop, feed the ribbon through the doily holes to the back and again, secure into place using a stitch. 
Make sure your ribbons all fall to even lengths, not only for aesthetics, but also for balance. 


And thats it, simple, yet gorgeous! I think you could have some real fun with this, I may steal this one for me, but make a fun hot pink one next for my little lady! 


Hope you enjoy, and I'd love to see if you have a go. 
Instagrammers, hashtag #windupdream or please tag me in your creations, I would love it! 


Thanks for stopping by, 


Charlotte 
xx

Now if you'll excuse me, I've some glitter to clean up!

Sunday, 27 September 2015

IN CASE OF EMERGENCY... Make this gift...

Christmas is coming, and that can only mean one thing! Time to start preparing, the first thing I aways begin with are the presents. I'm one of those people who loves spending time making or searching for the perfect gift, yet occasionally theres always that one that catches you out, usually the Secret Santa at school or the kids teachers. 


Well this year, I've a solution with this super easy DIY gift, a fire alarm inspired treat frame...


The supplies you will need...


The small box frame was purchased from The Range, but I have seen them in other craft stores like Hobbycraft for example. 


I'm a stickler for spray paint as I finds it gives the best finish but really you could use any type of red paint. Unfortunately the glass doesn't come out of these frames, so some masking tape was needed to protect the surface. 

Once the paint is dry, then comes the super easy part...


 Use a DYMO label maker, or similar, to stamp out your message...
'IN CASE OF EMERGENCY, BREAK GLASS'. 


Trim down some pretty craft paper, I used some from a Belle and Boo packet, also 
purchased from The Range. 


then assemble... 


Treats inside, so I chose a tea bag and coffee sachet, my own personal weakness, but you could use anything you know is a weakness! I guess that depends on how well you know your recipient! 


Stick your labels onto the glass and you are done! 


 As always, I'd love to see what you put in your 'emergency boxes' if you have a go! 

Have fun, and if you are a fellow Instagrammer, use the hashtag #windupemergency. 

Thanks for stopping by, 

Charlotte

xx


Sunday, 13 September 2015

Keep Calm, Cross Stitch and Say 'I Do' DIY

Ok, if you think this post has a little deja-yu vibe to it, that's because I've lifted it from my old blog (I'm planning to move everything over one day and delete the rest...) I was inspired to choose this one today as we had a fabulous time at a friends wedding yesterday, it was pretty magical! 

The main difference is, that this time I've created the pattern for you, you'll find an extra large photo at the end of the post. 

So, anyway, keep calm...


The hardest thing about being a creative with creative friends can be when it comes to present giving. Not because they're hard to buy for, but because they always give lovely handmade gifts, to which I cannot possibly respond with something from a store; no matter how well intentioned.

For this reason I store every idea for when it is most needed. So when I received this free chart from 'Cross Stitcher' magazine at the Clothes Show, I knew I was saving it for a gift, and I knew who for...


So I used the pattern for the crown, although I needed to make mine smaller so edited it a little. I also missed out the backstitch.


I then, in my mission to shrink it down, made the words up as I went along, shrinking each letter...


Whilst I recorded the process on instagram, I was mildly tempted to take one followers advice to 
"Leave it. The suspense will infuriate OCDists"
But, it IS a present... so I couldn't, however I do intend to bank that idea for later! 


It was indeed a gift for a bride to be... 


...Once framed, the perfect keepsake of her special day! 

I love being a creative type.


Hope you enjoy, as always, I'd love to see your results if you have a go, 


Thanks for stopping by, 


Charlotte

xx 


(Apologies, I just realised, I've only left 1 line blank between the crown 
and the 'keep', in the original I left 3)


Sunday, 6 September 2015

Pom-Pom Cloud Rug for Child's Bedroom DIY

Ok, so I know I've not done tonnes of DIY blog posts, but I have done lots of makes at home, and I have to say that this is my absolute favourite to date! Whilst you'll definitely need more than an afternoon for this one, it's really simple and worth persevering with!


This is my the cloud rug in my daughter's room, I love texture this rug provides, not only does it look good, it provides excellent sensory stimulation too!

So here's what you'll need... 


You can do this DIY without pom-pom makers, but I would recommend them, I ended up using 10 balls of yarn, yes, you'll need lots of that too, and this small rug consists of 116 pom-poms of varying sizes. 

NOTE: I chose a chunky wool yarn, the chunkiness meant the pom-poms were quicker with the thicker yarn, and most importantly the wool is more fire retardant than some other fibres, which meant that it would be safer as a home furnishing piece. 

First up is making the pom-poms for the rug, making sure when they're tied up, you leave a really long double tail. I started assembling once I'd made 95 pom-poms, but it still wasn't enough!! It's also worth me mentioning that the smallest pom-poms were the most useful during assembly.

I used to take my pom-pom making supplies with me whenever we were going on long car journeys, or I'd sis in front of the telly winding the yarn up... Like I said, this project needs perseverance, it takes a while. 


Once you've made enough pom-poms, use your scissors to give them a really nice hair cut and tidy the edges... Again making sure you leave the nice long tails intact. 


Now you're almost ready for assembly. Take your rug canvas and cut out the shape and size you want. I made a cloud with a flat base that would sit nicely next to the bed, but I'm sure there are lots of other shapes you could experiment with. 

When choosing the size, I didn't want to go too big, as this would mean more pom-poms, so I positioned it against the cot bed to get a good idea of what size would work. 


Now its time to knot all those pom-poms to the rug canvas...


...making sure that you tie those knots super tight. I double knotted each one. 


 I started with the pom-poms around the edge, varying the size I used randomly for a more textured effect. I think that the random sized pom-poms are more forgiving incase you make any mistakes. 


Eventually I'd completed the outline.

It's important to do the edge first as the shape can be very easily lost otherwise. 


Now its time to fill in the middle, working from the outside in, make sure you keep the pom-poms close together as it will make the whole product much sturdier. 

This is where those small pom-pom's become incredibly useful! 


Finally the end is in sight...


You'll be left with lots of loose ends, I debated with myself for a while how to finish these, I decided to just cut them, I'll explain why in a moment. 


And just like that, it's complete! 


I was so pleased with the results, I hope it has inspired you to have a go! I'd love to see what you come up with either in the comments or Facebook, alternatively, if you're a fellow instagrammer, use the #windup cloud.

I spent a long time deciding what colours to use for this rug, but I wanted something I'd never tire of as I knew it would be a long project. White might seem like a crazy choice for a rug for CHILD's room, however, the fact that I didn't tie the ends in means that I can cut out any pom-poms that may get stained and simply make a new one! So if you're making one from a colour you mightn't be able to replace, make sure you hoard one for future use!

Enjoy!

Thanks for stopping by,

Charlotte
xx


Tuesday, 23 June 2015

Radio Silence...

Having 0 followers at the moment means I doubt very much you'd noticed my radio silence, but I wanted to apologise anyway...

After a good start, it all got a little too much. Starting a blog probably wasn't the best idea in the middle of exam season, which for me is always crazy, late night revision and constant marking of mock questions doesn't leave much time for me. On top of that, we've done something VERY exciting, we've only gone and bought ourselves a new house!!!

So that pretty much sums up where I've been, I almost applied for a promotion at work too, but realised I'm no kind of superwoman and would have crumbled pretty much right away... Baby steps right?

As expected when one buys a new house, I've gone Pinterest crazy, but shhhh.... I'm keeping it under wraps for now. 

Sunday, 21 June 2015

Happy Fathers Day - Reclaimed Beer Carrier

Happy Father's Day to all those Daddy's out there! 

It's the second time we've celebrated Fathers day in our home, last year was a bit of a fail on my part however. I'd not long returned to full time work, juggling that and a 7 month old was hard going, a bottle of beer and the Peppa Pig book 'My Daddy' was about all I could manage. So this year I had to make up for it! 

So I thought it was about time for a little DIY, this one however, is definitely not for kids. 

If there's one thing my husband appreciates, its good beer, so I decided to get him some nice beers and thought I'd laser him a little slot together beer carrier using the laser cutter, this would also allow me to personalise a nice little message for him. 

That was until I came across this great little tutorial for Wedding Beer Totes on The New Hobbyist Blog, I was totally smitten with the idea of the tote with a bottle opener on the end so began to look for some salvageable pieces of wood to use at work. 


After a good rummage I found a beautiful piece of beech that had been removed from one of the school workbenches, it was great, covered with small drill holes and lots of paint and glue splats from over the years. Sold. I hadn't yet fully decided about the handle but had a lovely old ruler to use for the side panels, we've no need for inches anymore, with these, I was almost ready to go. 


I also loved that the ruler was from Birmingham, it's our city, or at least the closest to us, and where my husband was born.


I also searched for a wall mounted bottle opener on eBay, there was lots of choice but I just opted for cheap, cheerful and quick delivery. 


The next job was to find something for the handle, I had considered an old broom handle, but wasn't sure about how well it would hold up, fortunately we had lots of old metal tube I was able to use, so using a hacksaw I chopped it to size. I considered just bashing the handle to deform it, this would work but I wasn't sure how I'd get it into both ends of the carrier, so my colleague and I came up with a nifty technique (sorry I don't know the proper name for this technique, I'm out of my comfort zone!) but we sawed a small section from the centre of the tube on each end and hammered in a small piece of thin ply, this secured it nicely and added to the overall industrial appearance.


You may have noticed I decided against the sections to separate the bottles, I may come back to this and create some removable sections, but of now I decided to leave it as beer bottles come in so many different shapes and sizes and also, this way there was room for snacks! 


Only thing left was to fill it with some tasty beers and some suitable snacks, beef jerky and peanuts, I also got him some pork scratchings too but couldn't quite squeeze them in. 


Hope you all like my efforts, I'm pretty pleased with how it turned out and thank you to The New Hobbyist for such a fab tutorial, I bet his groomsmen loved them as much as my husband! I'm just sorry I didn't take more photos! 


Thanks for stopping by, 

Charlotte