Wednesday 3 May 2017

Days 21-30 of #The100dayproject #100randomanimalfacts

These 10 sketches were just done with crayon, and I was not a fan, maybe its the simplicity, I'm not sure, but I am glad I've finished! I think the colours of my crayons just weren't vibrant enough, and whilst I think I created a couple of cute images, they whole set seem quite week, hoping to counteract this with the next set, as I do feel these fell a bit 'flat'.

But I did learn a few new interesting things, here are the latest 10...


I'm not sure who my favourite was this time, probably army caterpillar, he looks like a dude.

I'd love to know what you think, also, I'd love a few suggestions for facts, please let me know any random facts you have tucked away in your brains!


Thanks for stopping by,

Charlotte

xx


Sunday 23 April 2017

Days 11-20 of #The100DayProject #100daysofrandomanimalfacts

So I made it through the next 20 days and whilst I really enjoyed these, they were certainly a challenge, trying to find a prop and a fact that would marry up.

So for those of you that haven't been following along on Instagram, here are days 11-20...

Every day's a school day right?


(Ok, so maybe I cheated here for Easter Sunday, but did you know rabbits have 28 teeth!!!)


(The colour variation is a result of the time of day I shot them, sorry!)

Which one is your favourite?


Thanks for stopping by,

Charlotte
x

Saturday 15 April 2017

Salted Caramel Easter Nests

If you're anything like me, the phrase 'salted caramel' will instantaneously make you salivate.

So I had an idea to shake up the old classic cornflake nest and make these for Easter... My 3 year old helped me so these are great to make with kids!

Although, I tried to melt down Cadbury's caramel bars the first time I tried this, apparently they don't melt easily, who knew?!? (I'm guessing its because the sugar has a much higher melting point than the chocolate)


You will need: (Makes 12)

200g of pretzel sticks
250g plain chocolate
100g caramel chocolate bars (although I think caramel or fudge bits would work perfectly)
150g mini eggs

100g white chocolate (optional)

  • Break up your chocolate into a bowl. Cut the caramel bar (I used Cadburys Caramel for mine) into small pieces
  • Create a bain marie with a heatproof bowl over a pan of boiling water, melt your chocolate.
  • Once the chocolate has melted, stir in your caramel pieces.
  • Break up your pretzel sticks and stir through the chocolate until melted.
  • Spoon the chocolate and pretzel mix onto greaseproof paper, making nest shapes as you go.(You could also put them into cupcake cases)
  • Place mini eggs on top of the nests whilst chocolate is still wet.
  • I chose to drizzle white chocolate and sprinkles over mine to make them a bit more decorative, however, this is completely up to you as they look good without too!
  • Leave them to set, then enjoy!


Please be kind, this was the first time I've ever shared a recipe, as easy as it is!


Hope you enjoy, and let me know how you get on,

Thanks for stopping by,

Charlotte
x


Thursday 13 April 2017

Days 1-10 of #The100DayProject #100daysofrandomanimalfacts

After successfully completing the #MarchMeetTheMaker Instagram challenge, I decided it would be fun (with a little persuasion from my friend) to take part in the #100dayproject, I had an idea and was desperate to roll with it, so here I am giving it my best shot.

I'm a massive fan of pub quizzes, game shows and random trivia, so I figured it would be fun to illustrate random facts about animals, and so far I'm really enjoying it.

Days 1-10 went something like this...


I decided on watercolour for the first set, I'm planning to use a different technique every 10 days, because this wasn't challenging enough! Haha!


10 down 100 to go...

Any one got any suggestions for me? 100 days is a long way off yet, I think I'm going to need all the help I can get!

You can see how I get on by searching the hashtag #100randomanimalfacts on Instagram.


Thanks for stopping by,

Charlotte
x


Sunday 11 October 2015

Vintage Lace Doily Dream Catcher DIY

I'm all swept up at the moment in a house move that has come to a stand still, however, that can't stop me from planning for the new look of the new house. 

Dream catchers seem to be a big thing at the moment and I've been dying to make one for little Elsie's room, so here is my version in a nice DIY blog... Although, I'm so pleased with the results I may just have to keep this for myself! 

I think this would make a fabulous gift, a lovely Christmas decoration, or be perfect for a wedding... The possibilities are endless. 


So here's what you'll need. 
(I picked my doily up from a vintage fair a while back, and the rest of my
 supplies came from Hobbycraft)


The first step is super easy, but takes some waiting for the glue to dry, 
simply paint the mod podge onto one side of the doily. 
Once dry, repeat on the other side.
After each coat ensure the doily is sat 
in the shape you want it to be at the end as this will fix the shape.


(you could dip the doily into mod podge to speed up the process, however I was wary that this may lead to the it pooling between the doily holes which I wanted to avoid.) 

On the second coat, I also took the opportunity to 'glitter dip' the feathers. 
Simply paint your feathers with mod podge and dip them into the pot of glitter. 
You may wish to try filling a dish with glitter and lying the feathers flat into this if you don't want the feathers to split. 


Once everything is dry you are now ready to assemble. 
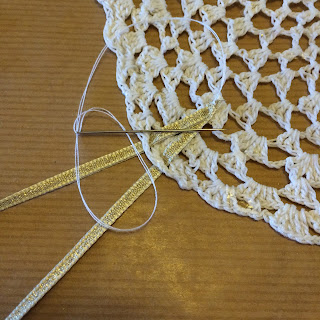
Find the centre point at the top of the doily and feed your ribbon through to the back, then secure it using a needle and thread. 
You could tie a knot here, but I do like that the stitch keeps the ribbon flat and more control over the way the ribbon hangs. 


At this point I decide that the doily might need sprucing up a bit, I did consider adding beads, but I had the glitter and the mod lodge out so thought I may as well make the most of the mess! I just pasted the edges, before carefully sprinkling glitter over the top. 


Now cut your ribbons to the size you want. Remember, you can always shorten if needed later, but you can make them longer, so if you're not sure, go a little longer, then take away. 

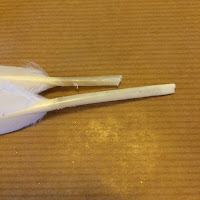
I then trimmed all my feather 'stems' to an even size and filled them with mod podge before inserting the ribbon side the stem. Again, I was trying to avoid knots here. 
I decided to add beads to the top of the feathers for a nicer finish.


I then tied a knot at the same point of each of the feather ribbons and added another gold bead for extra detail. 


The other ribbons were super easy, I just tied a knot in the end and threaded beads on. 


You should now have all these parts ready to assemble...


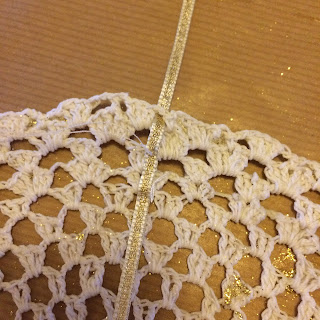
Using the same method as for the ribbon loop, feed the ribbon through the doily holes to the back and again, secure into place using a stitch. 
Make sure your ribbons all fall to even lengths, not only for aesthetics, but also for balance. 


And thats it, simple, yet gorgeous! I think you could have some real fun with this, I may steal this one for me, but make a fun hot pink one next for my little lady! 


Hope you enjoy, and I'd love to see if you have a go. 
Instagrammers, hashtag #windupdream or please tag me in your creations, I would love it! 


Thanks for stopping by, 


Charlotte 
xx

Now if you'll excuse me, I've some glitter to clean up!